Monday, October 29, 2018

Success! I really did USE UP a scrap!

I quilted a little table mat this week.  Trimmed up the edges and started looking for binding.  My calculations determined I needed to bind an edge 60 inches long.


I came up with this piece of fabric -- exactly the right colour.  It was less than 7.5 by 10.5 inches, though.  

I cut the piece into six strips just over an inch wide.  (This is a table mat, so a single layer binding will be fine.)


I joined the strips with tiny seams, abandoning my usual diagonal joins to conserve fabric.  Then I pressed under 1/4 inch along one edge.  Measured it -- this looks like it will work.

Then I sewed the binding into place.  It reached all the way around with enough for a seam.  There was even a tiny bit left over!  

 I'm very pleased to have this tiny UFO done, and I'm ridiculously happy about using up that bit of fabric!


Friday, September 28, 2018

Some finished quilts

As a new season of quilting starts up it is time to clear the decks a bit.  Several small projects that were made as class samples have been quilted and bound over the summer and are on their way to the regional hospital for use in the preemie ward.

Starting with a square and adding frames is a process with lots of possibilities.  This little quilt used strips made of random sized scraps for the frames.  Using one fabric for all the light areas adds a bit of unity.

Making framed squares and then cutting them into quarter blocks leads to the popular Bento Box pattern.  Perhaps the pattern gets lost a bit with all those fabrics, but it is definitely cheery.

After all the scrappy fabrics in the previous two quilts it was time to make a top using only three fabrics.  The blue was the middle band in each block and that gave the opportunity to create a path through the yellow and butterscotch squares.

The bin of flannel scraps never seems to end.  It took only a few strips to piece a backing.


Wednesday, August 22, 2018

Sampler quilt

This year our annual Friends' Challenge required us to use our initials to choose colours, blocks, and quilting designs.  My challenge piece was this Sampler Quilt which was made as a Block of the Month project in the sewing group.  Actually it was more of a Section of the Month -- each month participants were given the dimensions of the next section which they could then proceed to complete using whatever blocks and patterns they wished.  The results were all fantastic, and they were all completely different from one another. 

My version of the sampler uses a number of blocks beginning with D (my middle initial).  You can see Dresden Plates, Diamond Stars, and Delectable Mountains.  

My colours began with L.  I used Lemon, Licorice, and Lead.  And I called the white areas Linen (though that really isn't a colour name, but I liked it!).  


To complete the initials, I quilted with R patterns -- Right Angles, some Round bubbles, and a lot of Random lines.  
I like the way the quilting enhanced these basic little Rail Fence blocks.  

I seldom do a sampler project.  This one was an adventure all the way through and I am pleased that it manages to look reasonably coordinated in the end. 

Thursday, June 7, 2018

More baby quilts

The sewing group has an on-going project of making quilts for the regional hospital.  I find it simple to make class samples in the size needed for preemies. I love how this lets me have projects to show the group, uses some stash, adds to the stack for the babies.  Winning all around!
Lots of 8-pointed stars have been made lately.  Extra donated blocks make a cheerful quilt.
Can't play with diamond stars without making one of these!  Might have used the last bit of that blue Hawaiian fabric, too.

Hunter's Star is another beloved variation of stars made with diamonds.  


Little Memory Quilts -- blankets given to mothers who have lost an infant.  Donated fabrics. 


Wednesday, January 17, 2018

Piecing Adventures

I’ve been enjoying a new book.  Modern Quilt Magic: 5 Parlor Tricks to Expand Your Piecing Skills by Victoria Findlay Wolfe.  

Her first “parlor trick” is the partial seam.  And her designs are of the type I’ve looked at and and thought -- can’t make that -- so many partial seams.  Her take is,  “Yes, that involves a bunch of partial seams -- so?  Let's do it!”  

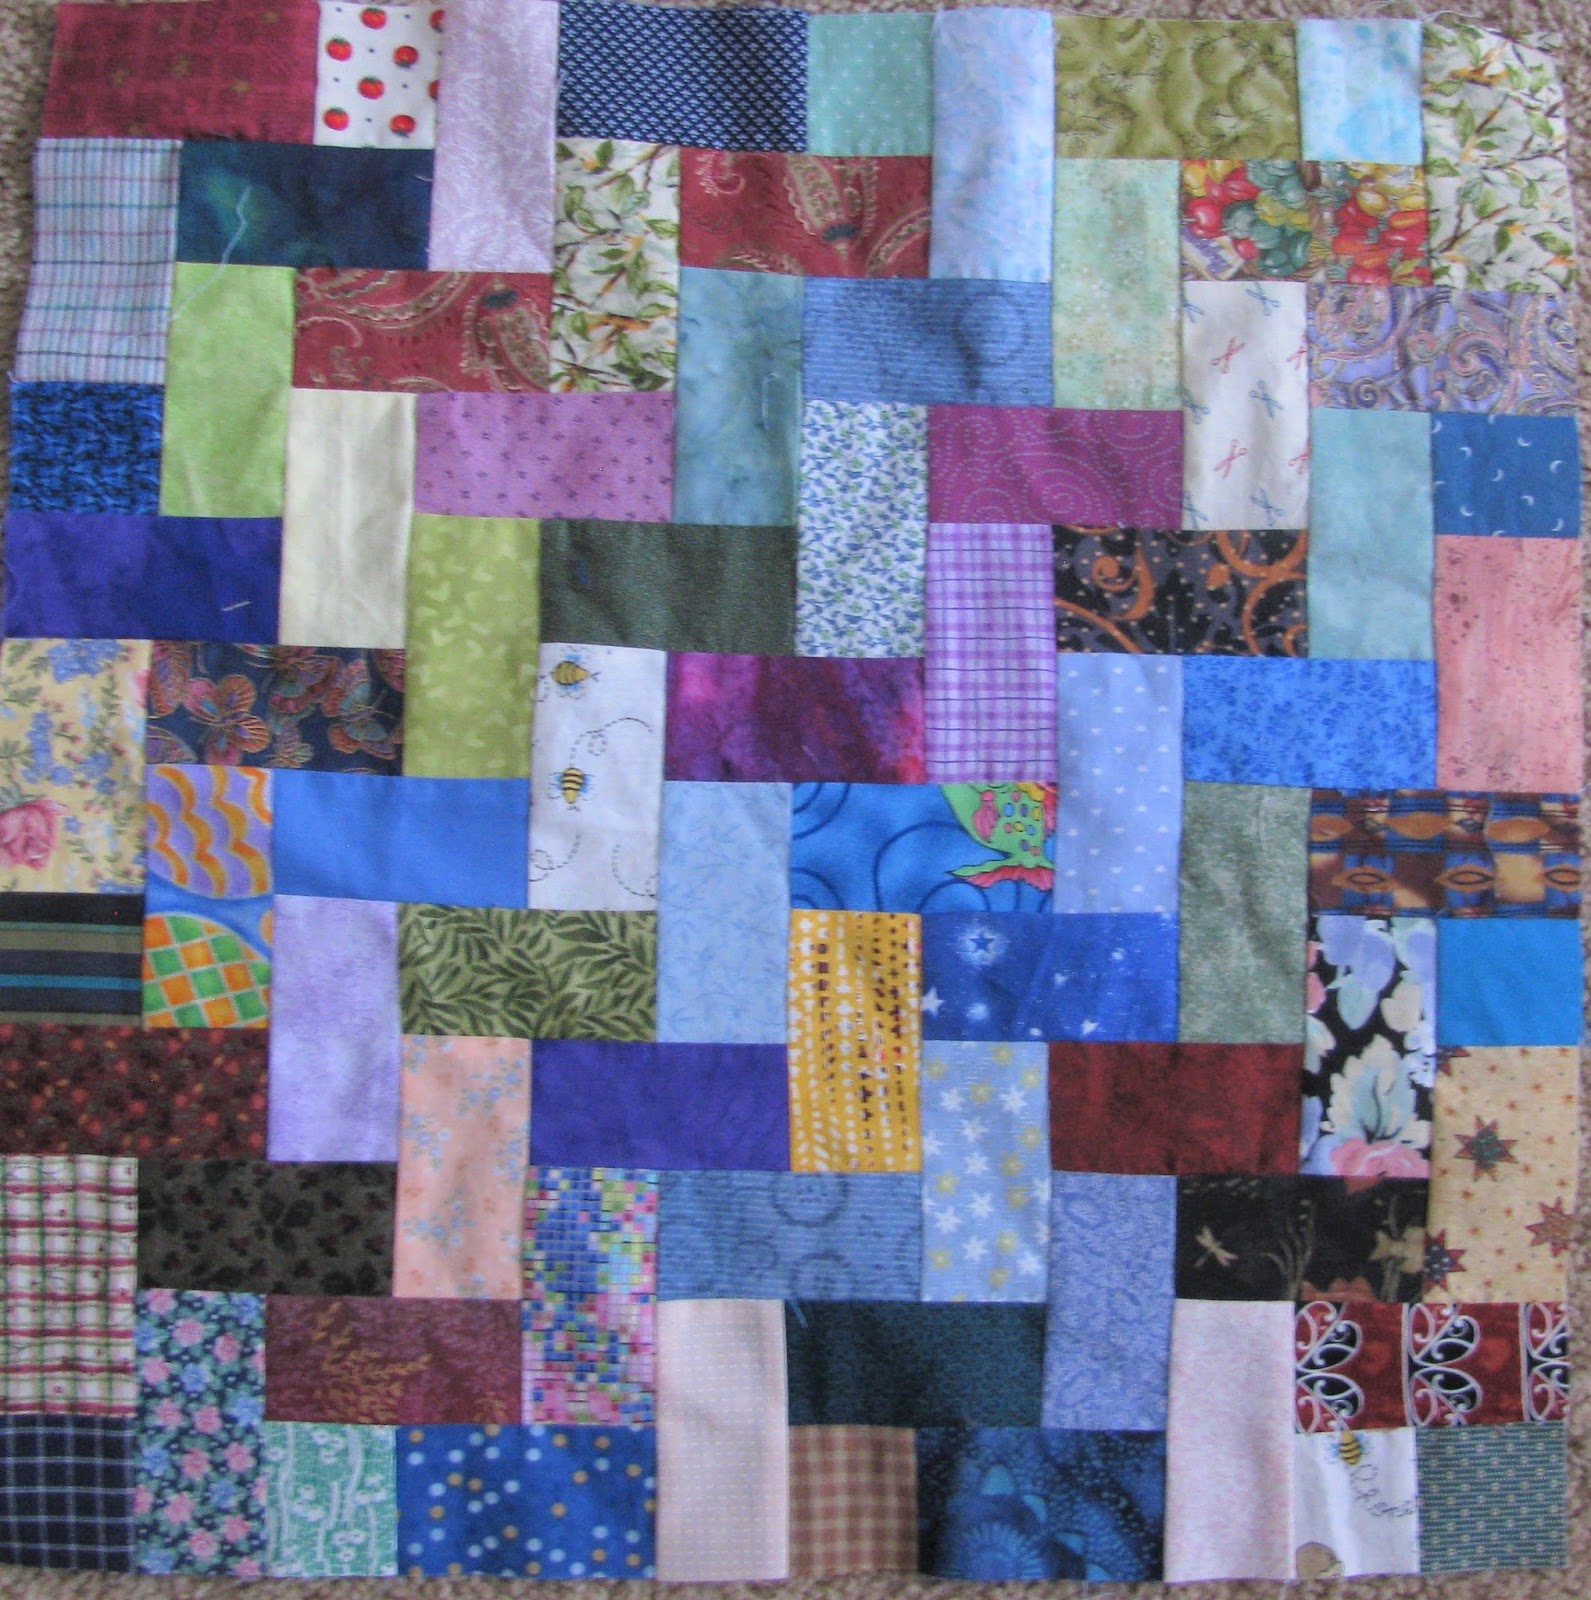
After studying her diagrams I set about making a little piece of interlocking rectangles, just to see how bad all those partial seams might be.  

The rectangles finish to 3" by 1.5".  That size was not difficult to piece, so I might try something a bit smaller.  The only "difficult" part of the construction process was not being able to use chain piecing easily.  
Well, that was easy!  Now what will I try?

I’ve always loved designs that look like strips are woven over and under each other. I've avoided these because construction usually involves “cheating” by seaming some of the strips.  With partial seams, though, this should work! 

I pieced rectangles from strips of various widths (used a very eclectic variety of fabrics spanning quite a few years) and cut background squares from white.  Then I laid out the whole thing on the living room floor and set to work piecing it together.  I made many trips back and forth to the living room as I found I needed to keep returning units to the layout to see where I was going.  But that was the only complicating part of the project, and I told myself that I was at least getting some steps in on my fitness tracker! 

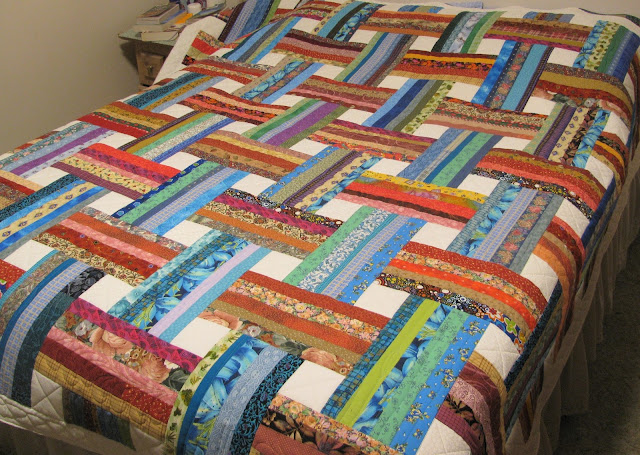
The quilting doesn't show on the scrappy fabrics, but I had a wonderful time adding a variety of free hand feathered designs on the warm coloured strips and lines and leaves on the cool ones.  
I’m delighted with Happy Trails! Let's see what other ideas are in this book -- perhaps some curved seams next?